Monday, June 24, 2013

Tweet Friends Quilt Along Post #3


Technique: How to accurately piece the triangle 
border on the Dresden Friends block 

Here is what you need:
Cut triangles according pattern instructions
Easy Angle Ruler by Wrights

Here is what you do:

Position the ruler on top of a triangle, aligning the edges of the ruler with the edges of the fabric. Trim off the point.  Flip the fabric over and trim off the other point.  The red triangle shown has had its points trimmed.


 To sew, position one triangle on top of another so that the trimmed end of the triangle on tip kisses the edge of the triangle on bottom.  Pin triangles if desired.
 
Start stitching at the "kiss" point, and continue stitching off the end. The black line indicates the stitching line. Continue adding triangles in the manner until you have enough to make a border.


Tuesday, June 18, 2013

Tweet FriendsPost #2 Applique Circles

Technique: How to make Applique' Circles

Tweet Friends has appliqued circles in several blocks and borders. Believe it or not, I actually enjoy making circles to applique.


Here is what you need:
Freezer Paper
1" circle punch (in the scrap booking section of Michael's/Joanne's/Hobby Lobby, etc)
Highlighter or permanent marker
Stencil brush or small paint brush
Starch
Awl or something pointy
Mini- Iron
One Pin

Here is what you do:
1. Press together two pieces of freezer paper. Make sure both are paper side up.
2. Scribble all over the freezer paper with the highlighter or a permanent marker. It is hard to see the marker in my photos, but trust me this is a crucial step because this is how to tell the "right/paper" side of your templates from the "wrong/shiny" side.

3. Punch out the number of circles you need using the 1" hole punch. (note: these are circles I am making for another project). Isn't that easy? No tracing, no cutting! The punches may seem a bit pricey, but, oh the time they save you.  By the way, if I design an applique pattern that calls for circles, the circle sizes are going to correspond with circle hole punch sizes.

4. Press the circles, shiny side down, to the wrong side of the fabric.

5. Cut out the circles, leaving a scant 1/4" seam allowance.

6. Move to your pressing surface. Anchor the circle with a single straight pin. Paint the seam allowance with starch.

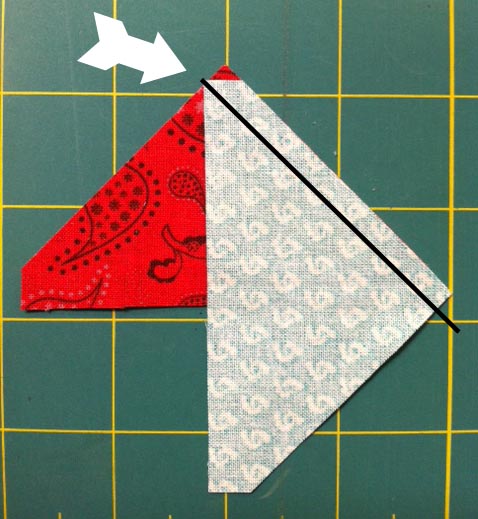
7. Use something pointy (a seam ripper works when all of your special applique tools are packed up for a workshop you are headed to) to pull the seam allowance over the template while you press it in place using the mini-iron.  Pivot the circle and pull and iron, pivot, pull, iron, etc.  until . . .


8. The circle is finished.  

9. Give it a press from the right side, inspecting it for "pokies".  If you find pokies, turn the circle back over, wet the offending area with starch, and redo.


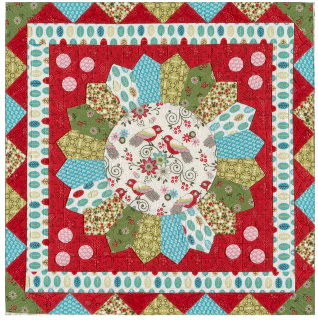
Okay, but what about the circle for the center of the Dresden Friends block?  
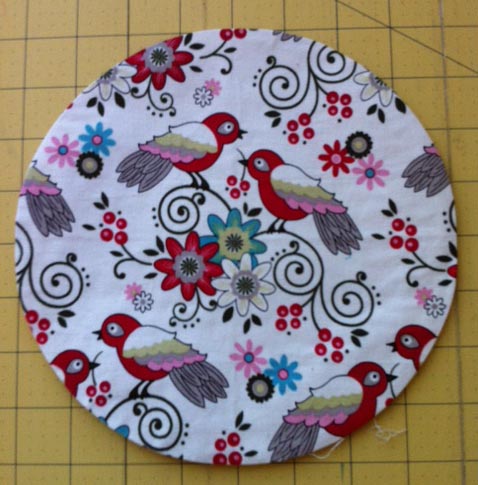
For it, use the same techniques. First though, you will have to trace the template. Notice I have creased the freezer paper vertically and horizontally.  This helps to position the circle correctly in the center of the wedge circle.

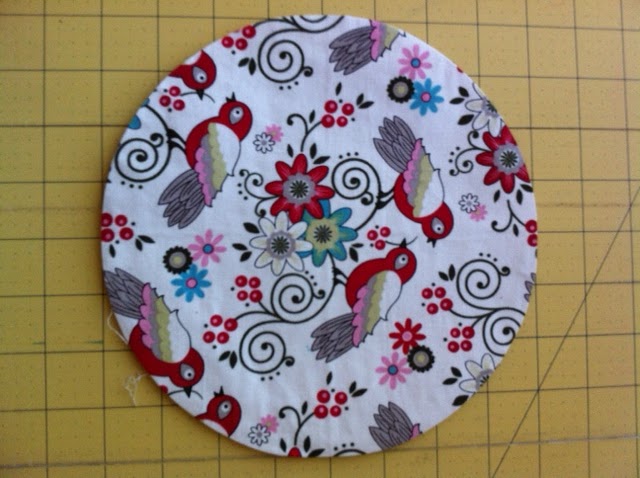
Press the freezer paper template to the wrong side of the fabric. Starch, turn, and press the seam allowance.
 
And here is the right side with a bird motif positioned in the center.


Tuesday, June 11, 2013

Tweet Friends- Block One Dresden Friends

Block One
Dresden Friends 
Technique: How to make the Dresden wedges


What you Need:
Fabric Strips, cut 4 1/4" x 11"
Background Fabric Square, cut 17"

Easy Dresden Ruler by Wrights
Prairie Pointer Pressing Tool
Rotary Cutter


What to Do:


Align the 6 1/2" line on the Easy Dresden ruler with the top edge of one of the fabric strips. (You may notice that I am using a fabric from my upcoming El Camino Real fabric line:) Cut on both sides of the ruler.  A revolving mat comes in handy for moving your fabric around so that you are not contorting yourself into any weird and possibly dangerous positions as you make the first cut.

 Flip the ruler and align the 6 1/2" ruler line with the bottom edge of the fabric strip. Cut.


Continue flipping and cutting until you have four wedges. Repeat this process on the other fabric strips.

 Now you are ready to sew. Here are my four Green Flower wedges. Fold them in half, right sides together.


Stitch a 1/4" seam on the wider end.  Feel free to chain piece all the wedges at once.


Separate wedges. Trim along folded edge seam allowance to reduce bulk.

 Finger press seam open.


Slide the Prairie Pointer pressing tool into the point of the wedge.  Align the seam line with the center line on the tool.  Press. Watch out, though.  Because the tool is metal, it gets hot.  Slide out tool.


 Repeat the process on all 20 wedges.


 Sew wedges in pairs, pressing seams open.

 Make four identical wedge sets.


 Join sets to create the Dresden.


Position the Dresden on the background square. Baste. Applique in place by hand using a neutral thread or by machine using monofilament thread and a small zig zag stitch.


Prepare center. 
Stay tuned for a subsequent post on the Freezer Paper and Starch applique techniques I use to create circles.


Wednesday, June 5, 2013

Tweet Friends Quilt Along Welcome

Welcome to my first quilt-along.  To kick off Tweet for Two , my first fabric collection with Marcus Fabrics, I've designed Tweet Friends, a 72" x 72" block-of-the-month sampler quilt.

The pattern and fabric kit are available at quilt shops and on my website nancyrinkdesigns.com. The fabric is currently shipping, so if you'd like your local quilt shop to participate in the program and need some info for the shop owner, here is a link where you can download a flyer that shows the quilt and fabric swatches:http://www.nancyrinkdesigns.com/schedule/76-quilt-along-flyer-retail-small.html


Now, more about the Tweet Friends Quilt-Along....


Quilt Along Details
On eight consecutive Tuesdays, beginning June 4, I will post a tutorial showing the methods and techniques I used to make the quilt. Mind you, I won't be supplying the pattern here on the blog, nor will cutting instructions be provided, although cutting techniques will be addressed. What will be supplied is the "how to."


Here are some of the techniques that will be featured in the Tweet Friends Quilt Along: 
·         How to use the Easy Dresden Ruler by Wrights 
·         How to use the Prairie Pointer Tool by Susan Cleveland 
·         How to use the Easy Angle Ruler by Wrights 
·         How to use 5/8” and 1” hole punches to make appliqued circles 
·         Freezer paper and starch method of applique preparation 
·         How to miter borders 
·         How to achieve flat, straight borders 
·         How to work with directional fabric


 What you need to get started
Tweet Friends Pattern
Fabric (see the pattern for yardage requirements)
Easy Dresden Ruler by Wrights
Prairie Pointer Pressing Tool by Susan K. Cleveland (optional)
Easy Angle Ruler by Wrights
1" Circle Punch 
5/8" Circle Punch
Aleene's Tacky Glue Pen
Light Box
Silver Marking Pencil 
White Marking Pencil
6 1/2" square ruler with a 45-degree diagonal line

Applique Supplies: freezer paper, starch, stencil brush, awl/chopstick, mini- iron