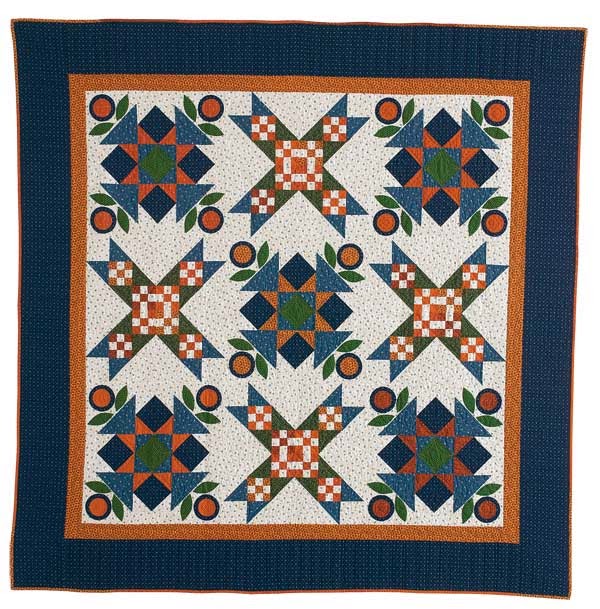
It's always so thrilling to see something I made in print! And on the cover! Can you see it peeking out from under the quilt on the far right?
Here is Clara's Pride which is in the Jan/Feb 2014 edition of McCall's Quilting. The blocks are large so they go together relatively quickly and there are only nine of them. The finished quilt is 70 1/2" square.
Pieces from three Marcus Fabric collections are in the quilt. We have kits with the fabrics shown for $94 on our website, nancyrinkdesigns.com.
Monday, November 18, 2013
Sunday, October 13, 2013
New Book
Oliver and I have been working on a new book. The tentative title is El Camino Real: Quilts Inspired by Early California History and is due out Spring 2014 from Kansas City Star.
There have been moments when I've asked my husband, "Are we crazy? I think we forgot how much work this is!" Of course that was when I still had three unfinished quilts with two weeks left until the photo shoot.
Today I feel relatively relaxed. The quilts are done, except for one that still needs the binding turned and sewn. But there will be some TV watching tonight and some more tomorrow, so that binding should be done in time for the photo shoot on Tuesday, which is two days from now.
Aaron Leimkeuhler, the photographer, is meeting us at La Purisima Mission State Park in Lompoc, CA where he will work his magic. This is my first time to be a present during a quilt photo shoot, so I am excited to see how it all works.
So after Tuesday, I'll have a few days to . . . hmmmm ....
....clean off my desk
....clean my studio
 ....put some labels on the quilts before shipping them back to KC where Aaron will do the flat shots and color correcting in his studio
....prepare for my Schoolhouse presentation at Fall Market
....package and ship some orders
....buy some Smith's cookies and Dewars chews for my friend Mary and the Marcus girls.
by the way, if you have never had Dewar's chews you are definitely missing out on one of life's better taste sensations. Dewar's is a family owned ice cream and candy shop that has been around forever in Bakersfield. Here is a link to their site: Dewars
and here is a video where you can see how they make the DELISH peanut butter chews: Chew Video
(Seeing how things are made fascinates me!)
Sunday, September 29, 2013
El Camino Real BOM--Almost Ready!
Here are most of the fabrics in my new line, El Camino Real. This collection is a colorful grouping inspired by California's rich history, a blend of Spanish, Mexican, and Native American traditions. Bright color and intricate motifs echo the decorative tile work and architecture of the region,
Marcus Fabrics is offering a block-of-the-month program that runs January 2014 through December 2014. I've designed the quilt and written the patterns. Today, I put the finishing touches on the patterns, and read through them one more time just to make sure I haven't missed anything. Here is what the pattern set looks like.
The El Camino Real BOM program is a 12-month program. But, that doesn't necessarily mean there are twelve blocks! El Camino has twelve pieced blocks set alternately with a block that combines piecing and applique'. Each block is named after one of the California missions along the El Camino Real (Spanish for "The King's Highway").
Here's a larger photo of the quilt. The finished size is 94 1/2" x 114 1/2". Perfect for your bed!
Stay tuned. Oliver and I are working on a book called El Camino Real: Quilts Inspired by Early California History, due out Spring 2014 with Kansas City Star. And guess what--the fabric will be making an appearance there too.
Monday, July 1, 2013
Tweet Friends Post #4--How to Make Skinny Legs
Technique: How to make the skinny bird legs in
Block #4: Feathered Friends
1. Cut a double layer of freezer paper that is approximately 1" x 8".
2. Take a small chunk of fabric. I used a piece that was about 6" x 10". Because the bird legs look like sticks, we can cut them on the straight of grain. When I want narrow stems that will curve, I use this same technique, but cut on the bias. Press the freezer paper strip shiny side down to the wrong side of the fabric. Leave approximately a 1/4" seam allowance. Starch the seam allowance and press it over the freezer paper. Let cool.
3. Peel off the freezer paper and cut the strip so that it is 1/2" wide from the fold to the cut edge.
4. Reposition the freezer paper, aligning its edge with the raw edge of the folded over seam allowance. Press to the fabric. Paint the seam allowance with starch and press it over the freezer paper. Allow to cool, but DO NOT remove the freezer paper yet.
5. Trim the seam allowance to approximately 1/8" wide. Now, remove the freezer paper.
6. Here is a skinny strip ready to be cut into skinny leg pieces.
Monday, June 24, 2013
Tweet Friends Quilt Along Post #3
Technique: How to accurately piece the triangle
border on the Dresden Friends block
Here is what you need:
Cut triangles according pattern instructions
Easy Angle Ruler by Wrights
Here is what you do:
Position the ruler on top of a triangle, aligning the edges of the ruler with the edges of the fabric. Trim off the point. Flip the fabric over and trim off the other point. The red triangle shown has had its points trimmed.
To sew, position one triangle on top of another so that the trimmed end of the triangle on tip kisses the edge of the triangle on bottom. Pin triangles if desired.

Start stitching at the "kiss" point, and continue stitching off the end. The black line indicates the stitching line. Continue adding triangles in the manner until you have enough to make a border.
Tuesday, June 18, 2013
Tweet FriendsPost #2 Applique Circles
Technique: How to make Applique' Circles
Tweet Friends has appliqued circles in several blocks and borders. Believe it or not, I actually enjoy making circles to applique.
Here is what you need:
Freezer Paper
Freezer Paper
1" circle punch (in the scrap booking section of Michael's/Joanne's/Hobby Lobby, etc)
Highlighter or permanent marker
Stencil brush or small paint brush
Starch
Awl or something pointy
Mini- Iron
One Pin
Here is what you do:
1. Press together two pieces of freezer paper. Make sure both are paper side up.
2. Scribble all over the freezer paper with the highlighter or a permanent marker. It is hard to see the marker in my photos, but trust me this is a crucial step because this is how to tell the "right/paper" side of your templates from the "wrong/shiny" side.
3. Punch out the number of circles you need using the 1" hole punch. (note: these are circles I am making for another project). Isn't that easy? No tracing, no cutting! The punches may seem a bit pricey, but, oh the time they save you. By the way, if I design an applique pattern that calls for circles, the circle sizes are going to correspond with circle hole punch sizes.
4. Press the circles, shiny side down, to the wrong side of the fabric.
5. Cut out the circles, leaving a scant 1/4" seam allowance.
6. Move to your pressing surface. Anchor the circle with a single straight pin. Paint the seam allowance with starch.
7. Use something pointy (a seam ripper works when all of your special applique tools are packed up for a workshop you are headed to) to pull the seam allowance over the template while you press it in place using the mini-iron. Pivot the circle and pull and iron, pivot, pull, iron, etc. until . . .
8. The circle is finished.
9. Give it a press from the right side, inspecting it for "pokies". If you find pokies, turn the circle back over, wet the offending area with starch, and redo.
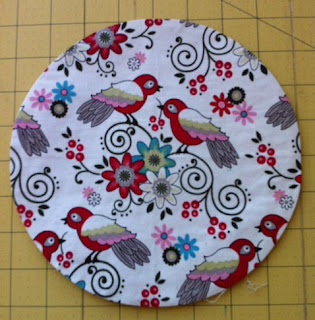
Okay, but what about the circle for the center of the Dresden Friends block?
For it, use the same techniques. First though, you will have to trace the template. Notice I have creased the freezer paper vertically and horizontally. This helps to position the circle correctly in the center of the wedge circle.
Press the freezer paper template to the wrong side of the fabric. Starch, turn, and press the seam allowance.

And here is the right side with a bird motif positioned in the center.
Tuesday, June 11, 2013
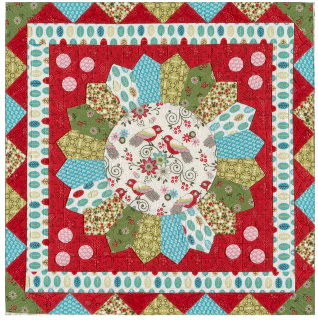
Tweet Friends- Block One Dresden Friends
Block One
Dresden Friends
Technique: How to make the Dresden wedges
Fabric Strips, cut 4 1/4" x 11"
Background Fabric Square, cut 17"
Easy Dresden Ruler by Wrights
Prairie Pointer Pressing Tool
Prairie Pointer Pressing Tool
Rotary Cutter
What to Do:
Align the 6 1/2" line on the Easy Dresden ruler with the top edge of one of the fabric strips. (You may notice that I am using a fabric from my upcoming El Camino Real fabric line:) Cut on both sides of the ruler. A revolving mat comes in handy for moving your fabric around so that you are not contorting yourself into any weird and possibly dangerous positions as you make the first cut.
Continue flipping and cutting until you have four wedges. Repeat this process on the other fabric strips.
Now you are ready to sew. Here are my four Green Flower wedges. Fold them in half, right sides together.
Finger press seam open.
Slide the Prairie Pointer pressing tool into the point of the wedge. Align the seam line with the center line on the tool. Press. Watch out, though. Because the tool is metal, it gets hot. Slide out tool.
Repeat the process on all 20 wedges.
Sew wedges in pairs, pressing seams open.
Make four identical wedge sets.
Join sets to create the Dresden.
Position the Dresden on the background square. Baste. Applique in place by hand using a neutral thread or by machine using monofilament thread and a small zig zag stitch.
Stay tuned for a subsequent post on the Freezer Paper and Starch applique techniques I use to create circles.
Subscribe to:
Comments (Atom)


